If you ever had a need to check if anything changed in the new table compared to the previous export, no matter in which column, then this is the article for you. We have created an M script in Excel that uses the left anti join to check for data inconsistency. it works with any number of columns. The only prerequisite is that both old and new tables have the same column names. You can find the Excel file here. In case you wish to learn how it’s done, check the remaining of the article.
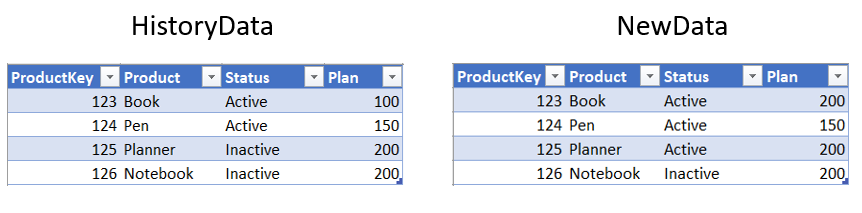
In this article, we will show you the way to track changes you make in your Excel table by using Power Query. The presumption is that we have one table that serves as a database (HistoryData). Then we have a new table that has the same structure as the first one, but here we can make changes (NewData). For example, we have a table with products containing status and planned sales. We might make changes to this table, and we want to see them all in one place compared to the original (history) table.
To demonstrate how this can be achieved, we will use a simplified example with a table containing 4 columns and 4 rows.
The Problem With Tracking Changes
The HistoryData table:
During the year, we might want to make changes in this table (for example change status or plan). For that, we will copy the table and create a new one called NewData. The idea is that we can see any change we make in the NewData table without having to scan the whole table row by row and compare it with the old table.
Using PowerQuery for Comparison
The solution consists of using Power Query to compare tables and load the new table to the sheet to see which changes occurred in the process. Also, we want to make our solution as dynamic as possible, so that if you rename a column or add a new one, the query does not fail to load.
We’ll start by getting both of our tables inside the Power Query editor. Our solution consists of merging these two tables and using the Left Anti join. This will give us the rows from the NewData table that will later be loaded into the sheet so that with every new refresh, we see only new changes. To do this, we must get the key column in both tables that will contain all columns concatenated in a single key column.

We will start with the HistoryData, although the same logic will be applied to the NewData table. The first step is to change the type of all columns to text. To achieve this, we will not simply change the type of every column because our query would fail every time someone changes the column name or adds a new column. To make our query more robust, we will use the code below to dynamically change the type of every column in our table.
ChangeType = Table.TransformColumnTypes(Source,List.Transform(Table.ColumnNames(Source),each {_,type text}))
Let’s reflect on the code above and explain how it is different from the simple Changed Type step.
Simple Changed Type:
#"Changed Type" = Table.TransformColumnTypes(Source,{{"ProductKey", type text}, {"Product", type text}, {"Status", type text}, {"Plan", type text}})
As we can see, the first part of the code is the same. The difference is that in our code, we do not reference the column names, but use List.Transform with Table.ColumnNames. The result of Table.ColumnNames(Source) is the list containing column names of Source table (the original HistoryData table).
Table.ColumnNames(Source):
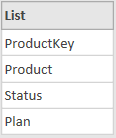
The List.Transform step then applies the transformation of each column name to text type and returns a new list of values as a result. This list is used as the second argument of Table.TransformColumnTypes function. The result is the same as the simple Changed Type step, but dynamic.
Merging Old and New Data
The next step is to create a new column that will be used to merge the two tables. We will create it by adding a custom column with the following formula:
 #"Added Custom" =
        Table.AddColumn(ChangeType, "HistoryKey", each Text.Combine(
                List.Transform(
                              Record.FieldValues(_),
                              each Replacer.ReplaceValue(
                              Text.From(_),
                              null,
                        "")),
                ";"))
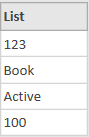
Now, we will observe the following code and its result starting from the inner part of the formula. The first argument of List.Transform, the Record.FieldValues(_) function returns for each row a list containing all the values from that same row. For example, for row number 1, the list looks like this:
The second argument (each Replacer.ReplaceValue) transforms all nulls from this list into blank values. This is used because merging with nulls and blank values give different results:
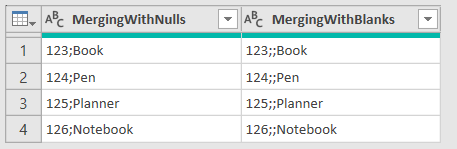
When we merge with nulls, we don’t have a separator between empty values, which would be the same as if we skipped the columns with null value while merging. With blanks, we get the empty value inside and we have two separators next to each other.
After this, Text.Combine function merges this text into a single column by using a semicolon as a separator.
The result:

After this, all that is left is changing the type of the HistoryKey, and making some additional modifications to make the query more robust such as Clean and Trim, replacing errors with blanks, and replacing spaces (“ ”) with blanks (“”). These steps ensure that if some small modifications occur (e.g. space behind text), they will not be treated as changes in case we only want to see actual changes to the values.
For the NewData table, we will repeat all steps, with the only difference that instead of the HistoryKey, we will name the key column NewKey.
Finally we have to merge these two tables with left anti join. We will merge it as a new query (called Changes) and remove unnecessary columns:
let
    Source = Table.NestedJoin(NewData, {"NewKey"}, HistoryData, {"HistoryKey"}, "HistoryData", JoinKind.LeftAnti),
    #"Removed Columns" = Table.RemoveColumns(Source,{"NewKey", "HistoryData"})
in
    #"Removed Columns"
Now we will load only the Changes query to the sheet and load other queries as a connection only.
Testing the Solution
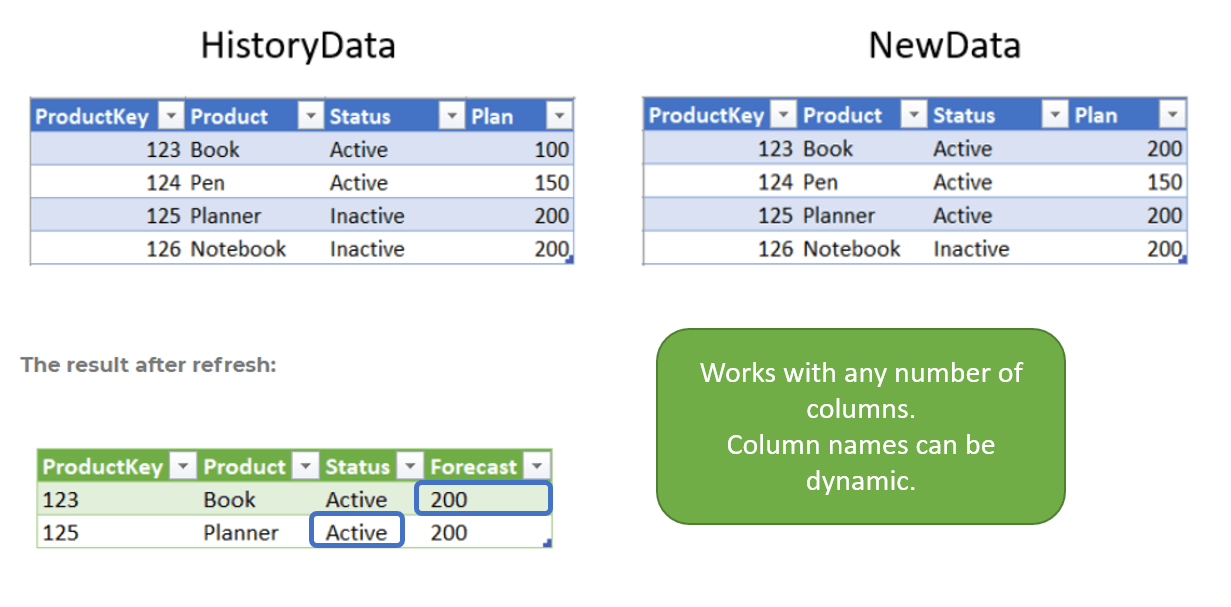
After we created our Changes table, we will test it to see if it works. We will change the NewData table by increasing planned sales of the Book product and we will change the Planner status to active:
The result after refresh:
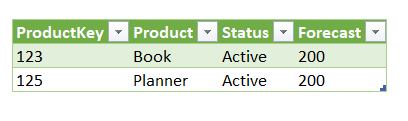
We can see only rows with new values (changed values), without the old data that has not changed. Now if we need to, we can update rows in the History table without having to search for changes by comparing two tables.
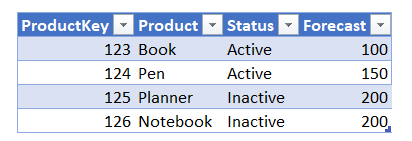
Let’s test our ChangedType step by renaming the Plan column to Forecast and adding a new column called Out of stock (in both History and New table).
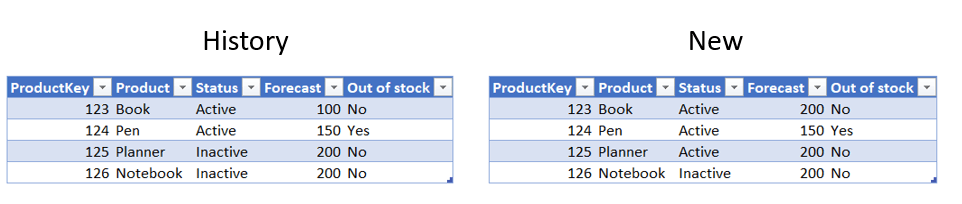
The result:

As we can see, the Changes table did not fail to refresh. The Plan column is now named Forecast, and the Out of stock column is added to the Changes table. The solution is versatile and can be used in many situations, like:
- Tracking changes that need to be implemented in the main table,
- Comparing tables coming from different sources but should have the same values (data quality),
- Finding changes compared to the previous version of the table.
We hope you find this solution useful and applicable to your work. Feel free to use workbook for tracking changes in your tables.
Thanks for reading!
In case you have any comments, please leave them below!
Hi, and thank you for this post! I get an expression error when trying to add the Key column. Any idea why? Expression.Error: The name 'ChangeType' wasn't recognized. Make sure it's spelled correctly.
For anyone struggling with the above, the fix is; = Table.AddColumn(#"Changed Type",
Thank you, yes, I want to compare the new table vs the previous export daily. This example starts with both the history data and the new data are ready to be compared. I stuck how to move from the new data to the history data for the comparison tomorrow, or for today's comparison, yesterday's data in the new data need to be moved in the history data before today's data is loaded in the new data. The datasource excel is updated everyday so the Power BI need to keep the history data within. Any posts on this?
Hi, I want to take a daily snapshot of the data in a Power BI table visual. The data in the table visual changes daily. Do you have any suggestions what I can try ?
It is for event data. I will get a list of events for 10 computers in the morning, next morning 5 of the 10 will be cleared, but say another 3 added. Sometimes all 10 are cleared and no new events for the day. So want to take a daily snapshot of the data, build a monthly trend of it.
Hi Nikolai, you cannot connect Excel to a visual in PowerBI. You can connect to the PowerBI dataset (live connection) to pull data in a PivotTable manner. You might try connecting to the dataset using PQ import mode with the following technique (haven't tested): https://freesbi.wordpress.com/2022/01/11/conexion-en-modo-import-a-un-dataset-de-power-bi-publicado/ Then you might isolate the data you need and create a self-referencing PQ script.
Hello, will this capture if ProductKeys are added or removed, as well? or must they always be static? thanks!
Hi, it will capture new keys added to the new data table. Other combinations of keys won't be captured. But you could try to tweak a code a bit to include those specific cases with the append option.
Hi Krešimir Ledinski, This is a brilliant idea! :) I have 2 tables, one StudyReport table that is updated manually by users and that gets new or changed rows data into it from a SalesforceReport (pulled only as a connection). The problem is, the StudyReport may have additional manual columns into which the users add their manual inputs. for e.g. The SalesforceReport may contain 7 columns which are present in the StudyReport, but in addition to those 7 columns, the StudyReport may contain 5 more manual entry columns totalling 12 columns. In such a scenario, how do i merge with a left outer join that updates the StudyReport with new or updated Salesforce data rows? Any help will be most appreciated.
Hi Krešimir Ledinski, Using your file as an example, with the Left.Anti join, it gives only the updated or new rows, which is what i want. But how do i join this back to HistoryData table and only keep the latest copy of these rows + the new rows? I am using your example in my file. So any help would be most appreciated.
Hi Sifar, sorry this comment must have slipped my attention. For appending changed data to the historical one you could try the self-referencing technique. We mention this technique in our blog https://exceed.local:50656/blog/incremental-refresh-using-powerbi-pro-and-dataflows/
That's great! Thank you. The explanation of every step took a lot of your time I think but saved tons of mine:)
Thank you Tasia!