
In one of our latest blog posts, we described a technique used to copy tables from other programs (e.g. Excel) into PowerApps collections. This solution had a drawback. Within the code, the column order was referenced to determine which column to collect. This means that, for the first column in the PowerApps collection, it gets the first column from the Excel table. The solution works great if your users will always have the same column order in their tables.
What if one user decides to switch the column order?
Addressing the Previous Article Shortcomings
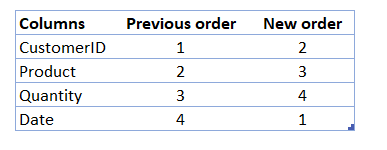
The first solution would not work because it would show the wrong data. To quickly recall, in the first static solution, we had four columns. The first one was CustomerID, the second one was Product, the third one Quantity, and the last one was the Date column. To continue with our problem, a new user wants to change column order, for example, take the Date column and put it as the first column. Now every other column has a different order:
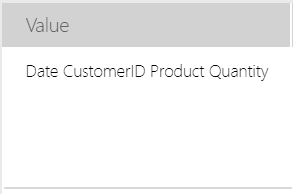
If we used the same code as before, we would get this result:
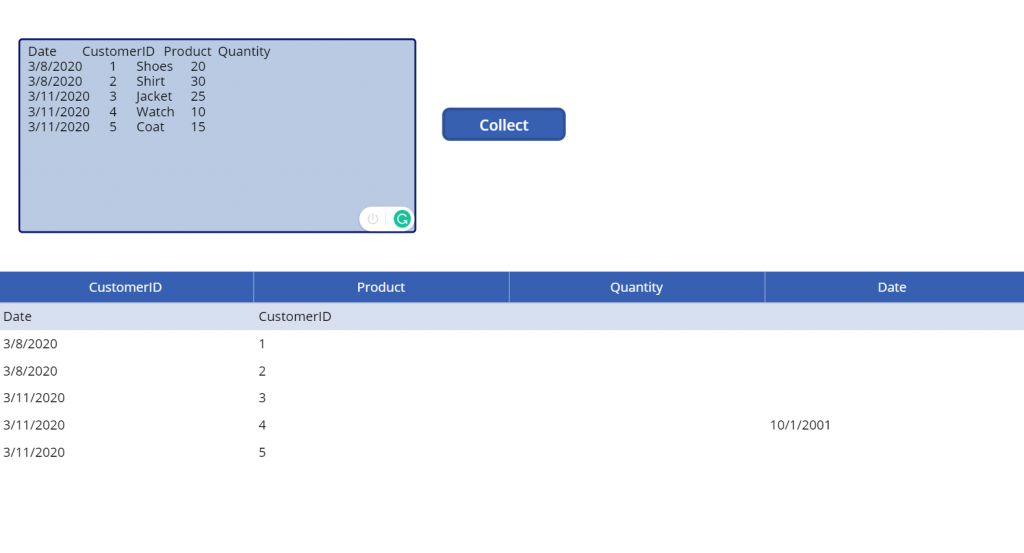
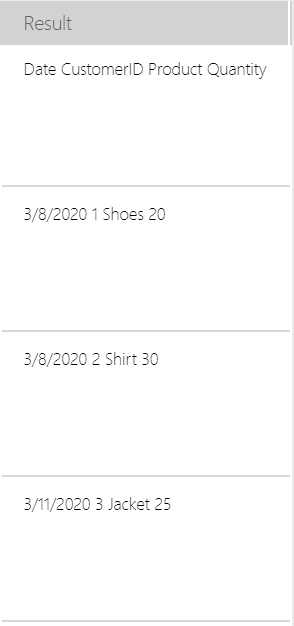
The data shown is completely wrong. The correct table is shown below:
To solve the ordering problem, we would need to change the part of the code that references the order of the column. That part is the count argument of the FirstN function (or for the first column the function First).
The problem:
An idea with Table Headers
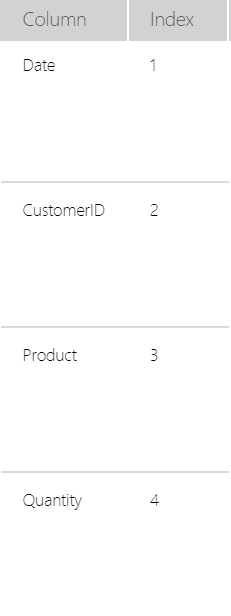
The idea on how to approach a fixed argument problem is to create an order based on table headers. This is achievable because when you copy the table from Excel, you copy the headers together with the data. The first row of the table (which is removed by RemoveIf in the last part of the code) will be used to mark the ordering of the columns. We need to have a table that has the column name, along with the index that shows the order of the column. To do this, we will create a new collection called ColumnIndex.
We’ll use this code to create ColumnIndex collection:
Clear(ColumnIndex);
ForAll(
    Split(
        First(
            Split(
                TextInput1.Text,
                Char(10)
            )
        ).Result,
        Char(9)
    ).Result,
    Collect(
        ColumnIndex,
        {
            Column: Result,
            Index: CountRows(ColumnIndex) + 1
        }
    )
)
In this code, we use the ForAll function to go through the table that contains the first row from TextInput1. Let’s examine the code step by step. The first argument of the ForAll function is there to get the table containing rows with column names. It starts by getting the first row from TextInput1.
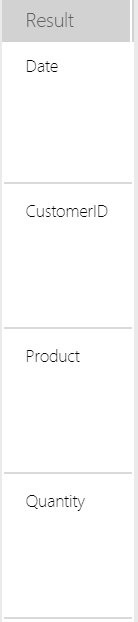
In the innermost part of the function, we use the Split function to split the table by Char(10) delimiter (Enter). This gives us a table with one column:
Each row contains all rows from the Excel table, separated by delimiter Char(9). From this table, we get the first row by using First(***).Result :
To separate this value in a column with 4 column names we use the Split function one more time, separated by the Char(9) separator, and then we get the first part of the code.
ForAll Source Arguments
After we get this table, we collect columns and indexes in our ColumnIndex collection.
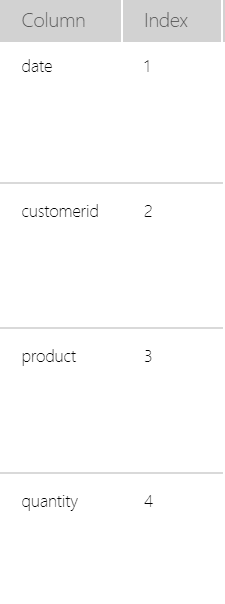
The first column is named Column and it contains the results of the table above. The second column is the Index column which increments numbers for each row in the collection. With this code, we get the columns we need to dynamically determine the column order.
ColumnIndex collection:
To make this case insensitive, we can add Lower function in front of the TextInput1.Text to always have lowercased column names (it will help us in the final code).
Clear(ColumnIndex);
ForAll(
    Split(
        First(
            Split(Lower(
                TextInput1.Text),
                Char(10)
            )
        ).Result,
        Char(9)
    ).Result,
    Collect(
        ColumnIndex,
        {
            Column: Result,
            Index: CountRows(ColumnIndex) + 1
        }
    )
)
Lowercased ColumnIndex collection:
Modifying the Static Solution
This gets us everything we need to modify the code from our first static solution.
We will use indexes and column names in the LookUp function to correctly assign each column with its order. Since our ColumnIndex collection contains only 4 rows, the LookUp will be fast.
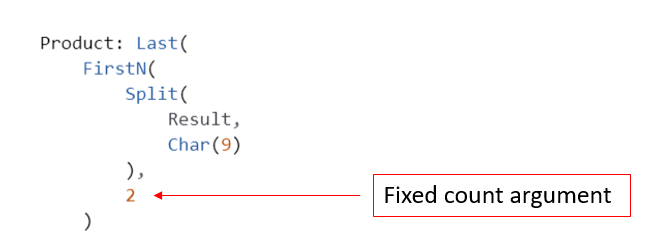
Instead of the exact number in FirstN count argument, we will use the LookUp for each column to return the index number. For example, the Date column will look like this:
Date: DateValue(
                Last(
                    FirstN(
                        Split(
                            Result,
                            Char(9)
                        ),
                        LookUp(
                            ColumnIndex,
                            Column = "date",
                            Index
                        )
                    )
                ).Result
To compare it with the static solution:
Date: DateValue(
                Last(
                    FirstN(
                        Split(
                            Result,
                            Char(9)
                        ),
                        4
                    )
                ).Result
In the old solution, the count argument is always 4. In the new one, the index returned by LookUp is number 1. By using LookUp function with the ColumnIndex collection as a source, we will always get the correct order of each column in the table. The final long code for this dynamic technique in the OnSelect property of the CollectButton:
Clear(ColumnIndex);
ForAll(
    Split(
        First(
            Split(
                Lower(TextInput1.Text),
                Char(10)
            )
        ).Result,
        Char(9)
    ).Result,
    Collect(
        ColumnIndex,
        {
            Column: Result,
            Index: CountRows(ColumnIndex) + 1
        }
    )
);
Clear(BulkCollection);
ForAll(
    Split(
        TextInput1.Text,
        Char(10)
    ),
    Collect(
        BulkCollection,
        {
            CustomerID: Last(
                FirstN(
                    Split(
                        Result,
                        Char(9)
                    ),
                    LookUp(
                        ColumnIndex,
                        Column = "customerid",
                        Index
                    )
                )
            ).Result,
            Product: Last(
                FirstN(
                    Split(
                        Result,
                        Char(9)
                    ),
                    LookUp(
                        ColumnIndex,
                        Column = "product",
                        Index
                    )
                )
            ).Result,
            Quantity: Value(
                Last(
                    FirstN(
                        Split(
                            Result,
                            Char(9)
                        ),
                        LookUp(
                            ColumnIndex,
                            Column = "quantity",
                            Index
                        )
                    )
                ).Result
            ),
            Date: DateValue(
                Last(
                    FirstN(
                        Split(
                            Result,
                            Char(9)
                        ),
                        LookUp(
                            ColumnIndex,
                            Column = "date",
                            Index
                        )
                    )
                ).Result
            )
        }
    )
);
RemoveIf(
    BulkCollection,
    Lower(CustomerID) = "customerid" Or CustomerID = ""
)
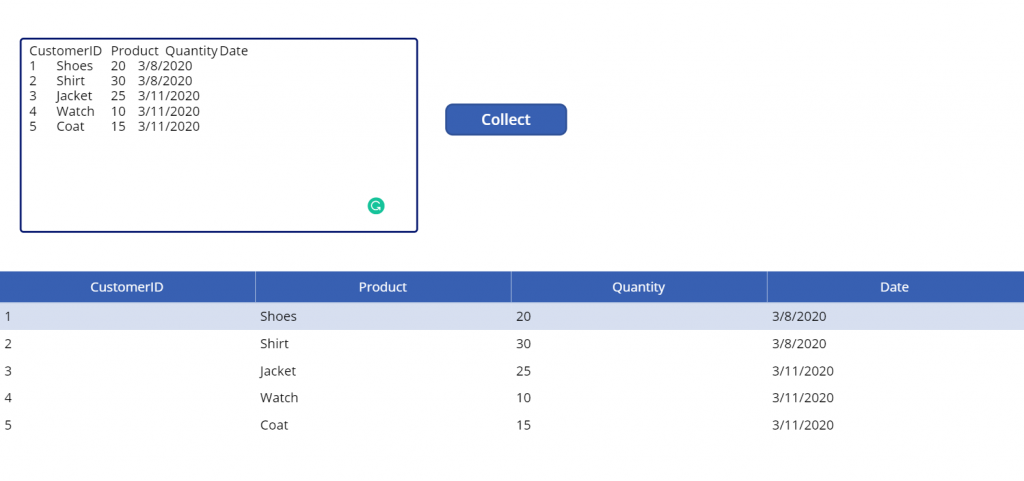
To test this code, we will use the same data from the first part of the blog:
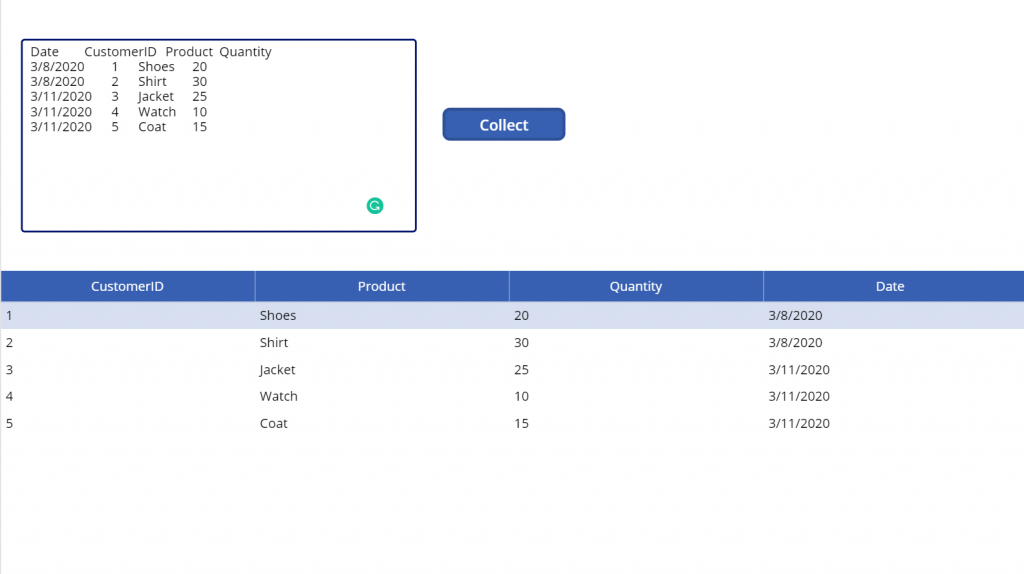
Our table is correct this time. If we want to achieve the same visual column order (as Excel table) in our data table, we need to add Switch or multiple If statements into FieldDisplayName and Text property of each column from the data table.
Wrap Up
To sum up, the dynamic technique used in this blog is based on creating an additional collection ColumnIndex that contains column names and their order in the table (TextInpu1). This is used later as the count argument of the FirstN function, which solves our problem and always gives us the correct order of the column.
I hope you liked this blog and find it useful.
If you have any questions, please comment below!